092000rev051815
You
are at: http://www.garsondesign.com/help

From: Garson
Design Services (GDS) A Full Service Graphic Design
Studio 1-707-439-5323 www.garsondesign.com
GDS Helpful Steps for Clients
Click
on the below quick links:
LOGO
1. How to
- Logo - download your logo
2.
How to - Logo - place your logo into Microsoft Word
(PC)
3. How to - Logo - resize logo for larger items (example: banner)
EMAIL (if
GDS is hosting your website and email)
1. To
Access Email You First You Need To
Access Your cPanel (Control
Panel)
2. How
to Setup Email: PC MS Outlook, Mac Email
3. How
to Access WebMail
(for email access while you are on the road or at home - away from the office)
4. How
to Setup an
Auto Responder (for when you are out of the office -
ie: vacation)
5. How to Add a Forwarder (forward
from your company email account to another - ie: yahoo or an aol account)
6. Trouble
emailing? (Trouble
sending or receiving emails....here are some possible solutions)
7. How to Setup Email Junk Filters (Getting too much junk mail or is your email box filling up? You need to setup junk mail filters)
FTP
1. How
to - FTP - ftp to access large files online
Software
1. PDF (Portable File Format)
how to view with Adobe Reader
WEBSITE
1. I
need a new website or existing website redesigned or updated
2. Improve
your traffic to your website with SEO (Search Engine Optimization)
3. How
to edit your website via Adobe Contribute
4. How
to view text in your browser window at a larger size
5. How
to use links on your website
6. How
to use online Web Calendar
7. How
to add paypal cart to Web/Calendar
1.
How to access/download your logo
The following instructions are provided
so that you (client or vendor) can access the art/logos that we have uploaded
to our website. This eliminates the need for separate files on CDs, or email
(which is problematic), and having to be sent to each vendor in need. This is
provided as a convenience for those with internet access and saves our time and
your money. The storage of client files on our server is a value-added service
and is of no extra charge. Please save this file, print out and forward as necessary.
On a PC? Right click and choose Save Target as... to your desktop or chosen folder.
NOTE: Currently, MS Explorer web browser will not view a CMYK or .esp logo (only can view a RGB logo)!
• To view, download as instructed above, place into your destination program and view.
1. Client
can forward/fax these instructions to vendors that you wish to access your digital
files, for promo or printing purposes.
Your
release of this form allows them the right to
do so.
2. Need
something else not on online...
If you seek another standard digital format...please call us we will
convert and upload new format.
If the vendor is in need of a hard copy or email of the art/logo,
there will be a charge from GDS to you, the client, of up to $10 per color
printout, etc; and for our time @ $30/hr. The vendor must seek permission
from the client first. It the client responsibity to inform vendors of
the potential charges to you, the client, as we will not always have the
time to do so. If a vendor calls us requesting a printout we will assume
that you have released our phone number to them and they have received
your approval and we can charge you for our extra work.
3.
Steps to access/download the file:
The
following is an example for you to follow.
You will receive a special web address
to access your logos that will look something like the following (your
company name would replace "example"):
http://www.garsondesign.com/proofs/example/
Index of /proofs/example
Name .....Last
Modified ........ ....Size
Parent
Directory . 24-Feb-2008
17:34 ............-
logo.eps 24-Feb-2008
17:34.........142k142k.............142k142k
logo.jpg 224-Feb-2008
17:34.........
.42k
NOTE:
The digital files above are already in a hi-resolution format and ready for
printwork.
For PCs:
1. Click once on http://www.garsondesign.com/proofs/example/
or your
special web address...copy
the address provided to you from your email and paste into your browser address
window and hit return.
2. Another window will open with all the different file types - example shown
above.
3. Select the file desired ie: logo.jpg
....3b. To
save, (right) click on the underlined file names and select "Save Target As..." in
.. .. . .the menu.
....3c. Save
the files to a new folder on your Desktop, or in your "My Documents" older
. .. .. .on your hard drive.
.
For Macs:
1. Click once
on http://www.garsondesign.com/proofs/example/
or your
special web address...copy the address provided to you from your email and
paste into your browser address window and hit return.
2. A different window will open with all the different file types.
3. Hold down the control key and then click file name desired...ie: logo.jpg
....3b. A small window
will open up...select: Save Linked to the Desktop
....3c. This is another
option: Click on link...ie: logo.jpg... The
image will appear in a new browser window.
..... ...Click and hold onto the
image and drag it to your desktop!
.... ....The image is now accessible in your
target program.
Warning: Your computer may / will change downloaded files names.
You will need to make slight corrections to the file names as noted below.
Without these changes you will not be able to place the file into another program or even open it properly.
1 Download the files needed to your computer
2 If .ps was added to the file name (ie: filename.eps.ps) – delete the .ps
3 If .eps changed to .ps – Add "e" to make it read .eps
010710rev010710
|
NOTE: If you are receiving a print version
of these instructions....
The above digital files above are accessible from the following
web address:
http://www.garsondesign.com/help
Once you go to the above address, via your browser, the above directory of
accessible files will appear. Follow step 3 instructions (above).
For email tech-support from GDS: mail@garsondesign.com
LOGO
Back to top
2.
How to place your logo into Microsoft Word (PC)
Browse to http://www.garsondesign.com/proofs/example/
1. Save each of the following files to a new folder on your Desktop, or in
your
"My Documents" older on your hard drive.
....To save, right click on the underlined file names and select "Save Target As..."
in the menu.
....logo.eps 24-Mar-2007
19:04 .........142k142k.............142k142k
....logo.jpg 224-Mar-2007
19:04.........
..42k
Warning: Your computer may / will change downloaded files names.
You will need to make slight corrections to the file names as noted below.
Without these changes you will not be able to place the file into another program or even open it properly.
1 Download the files needed to your computer
2 If .ps was added to the file name (ie: filename.eps.ps) – delete the .ps
3 If .eps changed to .ps – Add "e" to make it read .eps
010710rev010710
|
2. Open up a new document in Microsoft Word.
....Select 'Insert > Picture > From File...' in the menus at the top. A file
browser window will appear.
3. In the new window, browse to the folder containing the image files. If
it's on the desktop, or in the "My Documents" folder, click on the drop
down box near the top of the window, and select that location, and then
double-click the folder your files are in.
....If your computer is set to show thumbnails, it will now try to load small images
representing each of the files, if it does not show the thumbnails, look at
the file names to figure out which one you want to open.
4. Now click on the one you want, and then click the "Insert" button. A new
image should now appear in your document, and you can move it around just
like normal text.
....If you want to change it's size, click on the image, and boxes will appear in
the corners. Click on one of the corner boxes, and drag it until the dotted
line appears to be the size you want.
....If you want it so you can drag your image around anywhere you want in the
page, right click on it and choose "Format Picture".
5. In the new window, select the "Layout" tab at the top, and choose which
wrapping style you would like. In most cases, "Square" works well. Now
when you hit okay, you can drag your image anywhere on your page.
....And there you go! Now you have the image file on your page and ready to be printed.
NOTE: (07/02) This tutorial was written for Microsoft Word XP running under
the Windows XP operating system, your version of software may vary slightly.
Back
to top
LOGO
Back to top
3.
How to place your logo into MS Publisher (PC)
Browse to http://www.garsondesign.com/proofs/example/
1. Save each of the following files to a new folder on your Desktop, or in
your
"My Documents" older on your hard drive.
....To save, right click on the underlined file names and select "Save Target As..."
in the menu.
....logo.eps 24-Mar-2007
19:04 .........142k142k.............142k142k
....logo.jpg 224-Mar-2007
19:04.........
..42k
Warning: Your computer may / will change downloaded files names.
You will need to make slight corrections to the file names as noted below.
Without these changes you will not be able to place the file into another program or even open it properly.
1 Download the files needed to your computer
2 If .ps was added to the file name (ie: filename.eps.ps) – delete the .ps
3 If .eps changed to .ps – Add "e" to make it read .eps
010710rev010710
|
2. Open up a new document in Microsoft Publisher.
....Select 'Insert > Picture > From File...' in the menus at the top. A file
browser window will appear.
3. In the new window, browse to the folder containing the image files. If
it's on the desktop, or in the "My Documents" folder, click on the drop
down box near the top of the window, and select that location, and then
double-click the folder your files are in.
....If your computer is set to show thumbnails, it will now try to load small images
representing each of the files, if it does not show the thumbnails, look at
the file names to figure out which one you want to open.
4. Now click on the one you want, and then click the "Insert" button. A new
image should now appear in your document, and you can move it around just
like normal text.
....If you want to change it's size, click on the image, and boxes will appear in
the corners. Click on one of the corner boxes, and drag it until the dotted
line appears to be the size you want.
....If you want it so you can drag your image around anywhere you want in the
page, right click on it and choose "Format Picture".
....And there you go! Now you have the image file on your page and ready to be printed.
NOTE: (01/10) This tutorial was written for Microsoft Publisher XP running under
the Windows XP operating system, your version of software may vary slightly.
Back
to top
LOGO
Back to top
4.
How to resize your logo for larger items
Example: banner, billboard, signage, etc.
1. If you haven't already, download your logo.
Vector / bezier / outline paths based logo
2. If you have a eps (vector paths) version of your logo then you can already scale it up to billboard size without any loss in quality.
Pixel based logo
3. Some logo designs are better created in Photoshop (to create more complicated
art with photos / images).
Photoshop is pixel based and as easily scalable with no loss of quality up to
a certain point:
If your need is for an outdoor banner, the resolution (dpi or dots per inch)
can be about half (150dpi) the provided normal print resolution (300dpi).
Following is an example:
Original logo is 300dpi at 10-1/4" wide x 4" (usually in .jpg or .tiff format)
For banner output typically at:
100dpi this would give you a logo at 3 times the size or 30-3/4" x 12" without loss of quality
150dpi this would give you a logo at 2 times the size or 20-1/2" x 6" without loss of quality
For even larger sizes
You will need to resize / resample the logo in a program such as Photoshop.
Example:
The same example above can be increased to 85" x 36" for a 10' x 4' banner or...120" x 48"
In Photoshop go to:
Image, Image Size - Resample image and keep at 300dpi (about 3/4gb) or 150dpi (about 200mb) your choice.
Quality should be fine for a banner.
• If you want GDS to do the work or other logo variations / formats from
GDS it will require additional time/cost.
• Vendor requests should be directed to client initially.
Back
to top
EMAIL
Step
1.
Access Your Email cPanel (Control
Panel)
To access your email and controls
• Change the red
text to your specific web name info:
1. Type into your browser: www.yourwebsitename.com/webmail
2. A window will open asking you to fill in:
....Name: youremailname@yourwebsitename.com
....Passw: yourpassword (your
email password)
3.
Your cPanel now opens - now you can...
....1. Access WebMail (Your email away from your
office)
....2. Change Your Password
....3. Forward your company email to another email
(ie: yahoo or aol email account)
....4. Set up an auto responder (while you are away
from the office on vacation, etc.)
....5. Configure Mail Client
Back
to top
EMAIL
2.
How to set up Email in Outlook (PC) & Email (Mac)
If Garson Design Services (GDS) is hosting
your website and email - access to WebMail is available from anywhere in the
world!
These instructions will explain how to set up PC MS Outlook & Mac
Email and
to send and receive email from our servers.
• WebE-mailStep052115.pdf 1.5Mb
Back
to top
EMAIL
3.
WebMail (Access
your email from your web browser)
If
Garson Design Services (GDS) is hosting your website and email - you
can access your email online via your web browser.
Your WebMail is available
from any computer, from anywhere in the world!
• Change the red text to your specific
web name info:
To Access:
1.
Type into your browser: www.yourwebsitename.com/webmail
2. A window will open asking you to fill in:
....Name: youremailname@yourwebsitename.com
....Passw: yourpassword (your
email password)
3. A window will open...
You can change settings, such as email forwarding, auto responders, etc.
yourself!
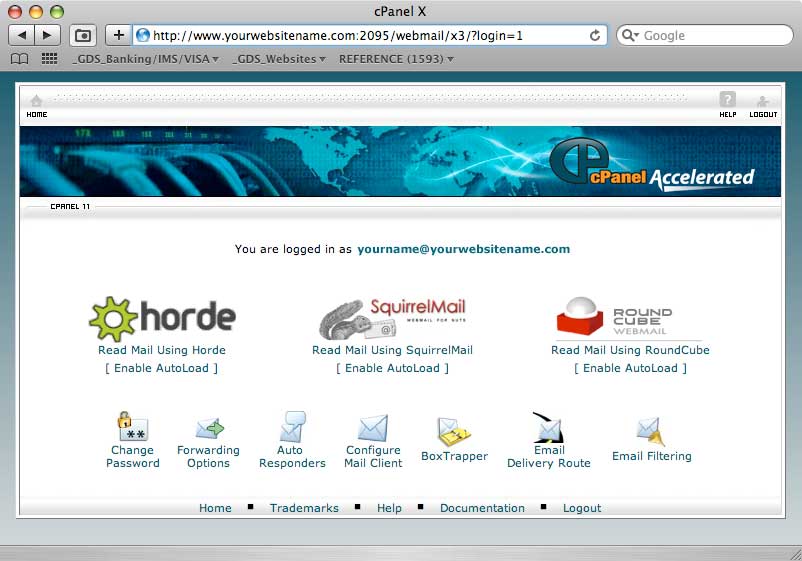
Click on 1 of the email programs (more info at link below)
ie: Read Mail Using Horde
Detailed Visual Instructions You Can Print Out:
NOTE:
Go to page 4 of PDF for WebMail steps
•WebmailSteps052914.pdf 220kb
Webmail Programs:

Horde is the most full featured webmail program with a robust address book,
spam filters, file management, etc.
Only drawback when you email with an attachment and hit send it's hard to tell
if anything is happening, it is! So just let it go.
Note: Horde WebMail has "help" features to access for the programs
particular features.
http://www.horde.org/ 081109rev081209

The WebMail with the funny name "WebMail For Nuts" is a program
for when you don't need all the extra features of Horde getting in the way.
Simple but effective program.
Note: Squirrel WebMail has "help" features to access for the programs
particular features.
http://squirrelmail.org/ or
http://www.squirrelmail.org/docs/user/user.html 081109rev081209

This webmail program is for when you don't need all the extra features of
Horde getting in the way. Simple but effective program.
Note: Roundcube WebMail doesn't seem to have a "help" feature but
there website has a lot of good info:
http://roundcube.net/ 081109rev081209
Note on all WebMails programs:
You can send multiple files at once.
If you are sending more than 5 attachments
it is best to compress the files or folder(s) via zip.
This will save you a lot of time of having to post each seperate file (can
not post a folder).
File size limit on all is: 50mb
Below shows the
cPanel landing web page after you log-in to your WebMail:
Note the cPanel extra features at the bottom.
Click on the email program you want to use or to check out it's features.
If you were redirected here and want to go back, click your browser back button.
081209rev081209
Back
to top
EMAIL
4.
How to Setup an Auto Responder
Purpose:
When your customer sends you an email they get an automatic message
that you are out of the office and can't reply to emails for the time
being. Saves
them from wondering why you aren't replying back to emails immediately.
These instructions will explain how to set up a Auto Responder:
EmailAutoRspndrStp.pdf 564kb
081209rev081209
Back
to top
EMAIL
5.
How to add a Forwarder
Example:
yourname@yourcompany.com forwards email to yourname@yahoo.com email account
Forwarding Steps
Once in your webmail cpanel...
1. Click on Forwarding Options
2. Delete your existing forwarder (if exists)
3. Click add forwarder
4. Next window opens - in the blank space type in you yahoo account,
then click Add Forwarder
5. Log-out of cPanel if done.
6. Problem:
....Even though your email is being forwarded to another email address...
....Your original email account will
fill up if you are not running spam protection
or not deleting old files especially emails with large attachments.
....Eventually your account will go
over quota and possibly freezing your account! :
(
....Solution:
To prevent this you will need to go into your WebMail and...
....4.1 Setup spam protection filters
....4.2 Periodically clean through and delete
old email, especially emails with large attachments, and junk mail.
....4.3 Request an increase in your email
box size from GDS. We may notice
in advance and automatically increase for you.
Back
to top
6.
Trouble
Emailing? 062309rev062309
Trouble
sending or receiving emails....here are some possible solutions.
1. If you are using local software, ie: Outlook, MacEmail, etc.) your emergency
alternative is to use...
....Webmail
(remote, online email software we provide)
....1.1 If webmail is working then
the problem is with your computer and/or
your computers email program.
2. Test emailing from a different computer — could be trouble with your
computer and/or
its email program.
....2.1
If email worked from the other computer by using a different email address....
..........Add your email to that computer (if
not on there already) as
a emergency alternative and test.
..........If
the above was successful could be trouble with your
computer and/or
email program, then do....
....2.2 Run computer repair software — on a
PC run Disk Cleanup — on a Mac run TechTools
Link1 Link2 or
similar repair program.
....
....2.3
Make sure you are running (or buy to use) Norton Anti-Virus or similar anti-virus
software.
3. Call Best Buy's "Geek Squad" for onsite tech support — your
computer could be riddled with bugs and/or spyware or other technical problems
: (
4. Problem: Your email account will fill up if you are not running spam protection
or not deleting old files especially emails with large attachments.
....Eventually your account will go over
quota and possibly freezing your account! : (
....Solution:
See the next Step 7 - Email Junk Filters
Back to top
7. Email Junk Mail Filters 110910rev110910
Getting too much junk mail (especially for those who mostly use webmail)?
WIP
4. Problem: Your email account will fill up if you are not running spam protection
or not deleting old files especially emails with large attachments.
....Eventually your account will go over
quota and possibly freezing your account! : (
....Solution:
To prevent this you will need to go into your WebMail and...
....4.1 Setup spam protection filters - blacklist your spam emails
....4.2 Periodically clean through and delete
old email, especially emails with large attachments, and junk mail.
....4.3 If you require more email space - request an increase from GDS. We may notice
in advance and automatically increase for you.
Back to top
FTP 122007rev051815
1.
How to - FTP - to access
large files online
Some files may be too large for your email program or to slow to put
on a CD and deliver.
....
so FTP (File Transfer Protocol) is the alternative.
We can share files with each other this way.
VIA AN FTP PROGRAM 051715r051815 YOU....
UPLOAD
– Files/documents
from your computer to our ftp site (for
GDS access)
DOWNLOAD – Files/documents from our
ftp site to your computer (for your access)
• ClientFTPsteps.pdf
VIA YOUR BROWSER 122007r122007 Warning:
This info is old and needs to be updated.
DOWNLOADING
– Files/documents from our ftp site to your computer (for your access)
NOTE: You
can not upload files - you'll need a FTP program to do that - see above.
Mac
with Safari or Netscape Browser
PC with
Explorer Browser
Type url in browser:
http://www.garsondesign.com/ftp
Find the folder or file you need
Click to see example. FTP_ClientAccess.pdf
342kb
Back
to top
SOFTWARE
1.
PDF (Portable File Format) how to view with Adobe Reader
Adobe
Acrobat Reader -
Get it free! Click on the link below.
http://www.adobe.com/products/acrobat/readstep2_allversions.html rev103008

Adobe
Acrobat Reader & PDF Files
About PDF
Portable
Document Format (PDF) is the de facto standard for electronic distribution
of documents because it's the best way to keep the look and feel you
created intact. PDF files are compact, cross platform and can be viewed
by anyone with a free Acrobat Reader. And you can create PDF files from
any application using Adobe Acrobat - even directly from paper!
Additional benefits of using PDF:
• PDF files can be distributed globally via e-mail, the Web, corporate intranets
or CD-ROM.
• Acrobat Reader's navigation and zoom features enable closer review
of PDF file text and images, even within your browser!
• PDF files can be easily viewed and printed a page at a time.
• Links, annotations, live forms, security options, video, and sound can be added
to PDF files for enhanced online viewing.
Download
Adobe Acrobat Reader
Then follow the installation instruction enclosed to configure it with your browser.
Viewing Instructions
On a web page, simply click on a link that identifies the file as a PDF document
or click on the PDF icon . If your browser is properly configured, Acrobat Reader
should open and automatically display the PDF document. Use the Acrobat Reader
controls to change pages and zoom in or out as desired.
Printing Instructions
Once a PDF document is open, use the print control in the Acrobat Reader not
those in the your browser menu to initiate printing.
Back
to top
WEBSITE
1.
I need a new website or my existing one redesigned or updated
The need to to get your business online, or your existing website's
look updated, has never been more important.
More and more customers are resorting to accessing companies websites
to obtain critical information day or night. Potential customers can
find and see details about your product line or services and email
inquiries - all information which is easily updatable without the expense
of reprinting a brochure. Go with Solano Counties premier Design Studio
for professional results.
We can provide the complete package:
1. Domain Registration – We'll search fo names, provide you a list
to choose from, then reserve it for you.
2. Domain Hosting – We provide the physicall place that your website
will live for viewer access from their computers
3. Design from start to finish – As the premier design studio in
Solano County since 1992 we have the skills to make your website command
attention. ....We have been creating websites
since 2000 – we also know how to design natural navigation to ease
the viewer through your website.
4. Increase traffic to your website – You now have a great looking
website
– how do I draw attention to it, increase raning on popular search
engines.
....We provide SEO (Search Engine Optimization).
See number 3 below!
http://websites.garsondesign.com
2.
Improve your traffic to your website with SEO (Search Engine Optimization)
Search
engineoptimization (SEO) is the process of increasing the volume and
quality of traffic to a website from potential customers using search
engines like Google, Yahoo, and MSN. GDS can help you improve the “rank” of
your website in various search engines, therefore ensuring that your
website is listed higher in search engine results.
GDS can provide you this service. We consider how search engines
work and what people search for and will optimize your website
using HTML coding and Meta Tags to increase its relevance to specific
search keywords and phrases.
metaNameWrksht.doc 265kb
Back to top
3.
How to edit your website via Adobe Contribute
We
set up your website for you to edit. If you're comfortable
working in MS Word and picking up on new software then
you'll ease into this "client friendly" program
to edit your website without having to know coding.
Following is generic instructions that may have to be adapted slightly
for your particular needs.
ContributeGuide102208.pdf 1.75mb
Back to top
4.
How to view text in your browser window at a larger size
PC:
Explorer:
In menu bar > View > Text size > Choose Larger or Largest
Mac:
Press on "Command" "+" or "-"
Back to top
5.
How to use links on your website
Links that viewers click on
your website can be:
1. Link to another web page of your website or to an outside web page.
2. Link to a pdf (or word doc) you provide on your website or to a pdf
on an outside web page.
If possible it is always best to get the pdf from the outside source rather
than linking to because they could:
Take the pdf off their web page or change the web address the pdf is on.
Back to top
6. How
to use online Web Calendar
To add new events follow these steps:
1. Goto top Menu click Events/Add New Event
2. Fill in the details you want people to see (All boxes need to be filled out properly)
3. Basic Description is the header seen on the calendar day.
4. Full Description is viewed when either clicked on or cursor runs over the date.
5. Location - Address of the Event/Class
6. URL link to Classes/Events page or to online Flyer
7. Date - Add date of Class or Event
8. To add time use the pull down menu and choose Timed Event to pick start time and finish time. you have other options as well for All Day Event or an Untimed Event.
9. Save this page
Now move to next tab PARTICIPANTS:
1. Highlight Public Access - highlighting this will allow non registered/Logged in users to view your entries.
please note, If this is not highlighted no one will see the classes or events added apart from yourself.
2. Highlight all admins + Public this allows other admins to see and edit your dates when your not available.
3.Click Save
Download WebCalendar Steps PDF 3.4mb
Back to top
7. How
to add PayPal Cart to Website/Calendar
To add PayPal buttons to your website/calendar follow these steps in our PDF file:
AddPayPalCart121410Client.pdf
Download Add PayPal Cart Steps PDF 3.4mb
Back to top
NOTE:
If you need the Free Adobe Acrobat Reader or information about its
usage please go to:
http://www.garsondesign.com/GDS/links/links_software.html
If you are having trouble opening our pdfs, you may need to update
Acrobat Reader to the latest version!
Back to top
